Photo Guide for Scannable IDs
If you wish to obtain a scannable ID on our website, you'll need to provide us with a photo for us to complete the remaining process. Taking a good photo is a crucial part of making the scannable card look authentic. Regardless of how realistic the actual card may appear, if the photo doesn't meet state standards, security personnel nationwide won't permit you entry into bars or other establishments.
If you don’t know how to take pictures that look like they were taken at a DMV, don’t worry—we will guide you on how to take a good photo for your scannable driver's license.
Why Taking a Good Photo for Your Scannable ID is Important

|
State ID photos are typically taken in a manner that does not allow for flexibility in poses, expressions, or lighting. The lighting in photo booths or at the Department of Motor Vehicles (DMV) is often unflattering as it casts harsh shadows and emphasizes imperfections. The purpose of these photos is visual identification of individuals, so the emphasis is on capturing a clear and accurate representation of a person's face and features rather than creating a pleasing image. |
People are often instructed to stand straight and maintain a neutral expression when taking photos for state identification cards. This can make individuals feel nervous, potentially resulting in stiff facial expressions and an overall unappealing appearance.
Therefore, if you want to recreate a state identification card photo at home, you need to replicate the same environment as the Department of Motor Vehicles—harsh lighting and the tense posture and expression. Achieving a tense posture and expression is relatively easy, so let's explore how to set up your camera to capture a photo that meets state ID standards.
Set up the Camera
The choice of cameras within licensing institutions can vary based on the location and the type of identification being issued. However, the majority of institutions utilize digital cameras specially crafted for ID photo capture. These cameras are usually equipped with high-resolution sensors, enabling them to capture images with uniform lighting and precise color accuracy.
How to Take an ID Photo with Your Phone

Increasing the contrast in your phone settings can help you capture better photos for scannable IDs. Here are the steps:
- Open the Camera App: Find and tap on the camera icon on your home screen to open the camera app.
- Ensure Camera Lens is Clean: Wipe the camera lens to ensure no dust or dirt is affecting the photo quality.
- Focus: Tap on the screen where you want to focus or
wait for the camera app to autofocus.
- Adjust Exposure: If needed, adjust exposure by tapping on the brightness area on the screen or using the exposure adjustment feature in the camera app.
- Select Mode: Choose the appropriate shooting mode, such as Auto, HDR, Night Mode, etc., based on your needs.
- Set White Balance: Some camera apps allow you to
adjust white balance to ensure accurate colors.
- Capture Photo: Click the shutter button to capture the
photo. Some phones also support tapping on other areas of the screen or using volume buttons to trigger the
shutter.
- View and Edit: Review the captured photo, and if necessary, edit it using the camera app or other photo editing apps.
- Save: Finally, save your photo.
Please note that specific steps may vary depending on your phone model and the camera app you are using.
Certainly, nowadays, many photo editing apps on the market provide a dedicated template for ID photos. They can automatically adjust the background, image dimensions, and lighting. Moreover, you can customize the type of clothing based on your preferences, such as shirts, suits, jackets, and more. These apps are user-friendly and highly efficient. One of the image editing apps I frequently use is Meitu.
State ID and Driver’s License Photos: Legal Requirements
To help you gain a clearer understanding of what a proper State ID or driver’s license photo should entail, let’s delve into the legal prerequisites regarding their appearance and content.
These requirements might differ based on the state, jurisdiction, and type of ID under consideration, but their overarching purpose is to ensure that the ID photo faithfully represents the individual and is suitable for identification purposes. Here are some general requirements:
1. Size
| Common Photo Sizes(Inch) | Good Quality(Pixels) | Better Quality(Pixels) |
| 3.5*5 | 630*900 | 1050*1500 |
| 4*6 | 720*1080 | 1200*1800 |
| 5*7 | 900*1260 | 1500*2100 |
| 6*8 | 1080*1440 |
1800*2400 |
The photos must adhere to specific dimensions, typically 2 inches by 2 inches or 1.5 inches by 1.5 inches, depending on the state. However, if you follow the guidance on posture and lighting mentioned earlier, the idpapa team can assist in editing the photo dimensions for you.
2. Background
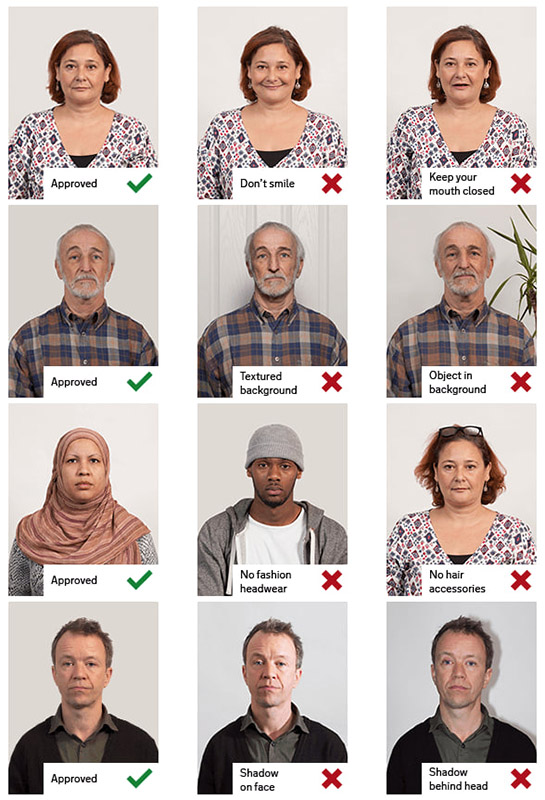
The photo background should be a plain, light-colored backdrop without any patterns or designs. This is to create a contrast that facilitates easier identification of the person's face.

3. Lighting
The
lighting should be uniform, without any shadows obscuring the person's face.
4. Expression
The individual in the photo must maintain a neutral expression, with open eyes, and gaze directly at the camera.
5. Head Position
The person's head should be straight, facing directly forward, and both ears must be visible. Since everyone has unique ear shapes, they are among the most distinguishing features, and thus, they must be visible in the photos.
6. Clothing
The individual in the photo should not wear anything that might obstruct their face, such as a hat or sunglasses.
7. Photo Quality
The photo must be clear and devoid of any distortions or blurring that might hinder the recognition of the person.
Driver’s License Photo Requirements
The ID Comment Sample page showcases ideal photos submitted by some of our customers. Depending on the type of scannable ID you're ordering (driver's license or state ID), you may need to consider specific photo-taking guidelines. Differences in ID photos between state ID and driver's licenses may vary by jurisdiction, but one distinction you should take into account, especially if you wear glasses.
Some jurisdictions may require driver's license photos to depict individuals wearing glasses if they normally wear them while driving, a requirement that might not apply to state ID photos.
This is because state IDs and driver’s licenses serve different purposes. State IDs are used to identify individuals while driver’s licenses are used as both proof of identity and to demonstrate that the individual is authorized to drive a car.
A driver's license can also serve to indicate whether the individual requires glasses for safe driving. This is why some jurisdictions mandate wearing glasses in your driver's license photo if you need them to drive. In the past, this was uncommon as glasses could obscure the face, complicating accurate recognition in the photo.
However, advancements in face recognition technology now allow for accurate identification even when the individual is wearing glasses, provided there are no reflections. Consequently, various licensing agencies permit glasses in driver's license photos if needed for driving. The requirement to wear glasses if necessary is not specific to a particular state.
The regulations regarding wearing glasses in driver's license photos may evolve and can differ between states and jurisdictions. Therefore, it is essential to research the specific requirements for driver's license photos in the jurisdiction from which you intend to obtain the scannable ID.
State ID photos may vary in terms of specific requirements such as size, background color, and lighting from state to state, although many of them result in similar types of photos.
Each state's DMV or licensing agency has its guidelines and regulations for state ID photos, aiming to ensure clarity, accuracy, and usability for identification purposes. For instance, some states print black-and-white photos on the actual ID or driver’s license, while others use color photos.
The decision to use black and white or color photos on an ID is typically determined by each state's DMV. The reasons for some states using black and white photos on their IDs while others use color photos can vary.
One factor influencing the decision to use black-and-white photos is cost. Black and white photos may be less expensive to produce than color photos, and some states may choose them to save costs.
Another factor influencing the decision is security. Some states believe that black and white photos are less likely to be altered or counterfeited than color photos, enhancing the security of the IDs.
Ultimately, the decision to use black and white or color photos on an ID rests with each state's DMV or licensing agency. While some states may opt for black-and-white photos for cost or security reasons, others may choose color photos to provide a more accurate representation of the individual's appearance.
