How to Take ID Photos?
If you wish to obtain a scannable ID on our website, you'll need to provide us with a photo for us to complete the remaining process. Taking a good photo is a crucial part of making the scannable card look authentic. Regardless of how realistic the actual card may appear, if the photo doesn't meet state standards, security personnel nationwide won't permit you entry into bars or other establishments.
If you don’t know how to take pictures that look like they were taken at a DMV, don’t worry—we will guide you on how to take a good photo for your scannable driver's license.
Why Taking a Good Photo for Your Scannable ID is Important
At IDpapa, we consider your digital photo as a crucial element for ordering a custom ID. Each state has specific legal requirements for government-issued photos, and if your photo does not meet these requirements, your customized ID may be deemed invalid. The photo you provide will be used for creating a scannable ID.

We strive to make the card look indistinguishable from a real ID, so the actual quality of the photo itself depends on you. That's why we provide you with comprehensive guidance on how to capture the perfect photo for your scannable ID.
Why State ID Photos Have Their Unique Appearance
Before you pick up the camera to take a photo of yourself, it's important to understand the differences between government-issued state ID photos and regular photos, as well as why they appear to be so significant.
State ID photos are typically taken in a manner that does not allow for flexibility in poses, expressions, or lighting. The lighting in photo booths or at the Department of Motor Vehicles (DMV) is often unflattering as it casts harsh shadows and emphasizes imperfections. The purpose of these photos is visual identification of individuals, so the emphasis is on capturing a clear and accurate representation of a person's face and features rather than creating a pleasing image. |
People are often instructed to stand straight and maintain a neutral expression when taking photos for state identification cards. This can make individuals feel nervous, potentially resulting in stiff facial expressions and an overall unappealing appearance.
Therefore, if you want to recreate a state identification card photo at home, you need to replicate the same environment as the Department of Motor Vehicles—harsh lighting and tense posture and expression. Achieving a tense posture and expression is relatively easy, so let's explore how to set up your camera to capture a photo that meets state ID standards.
Set up the Camera
The choice of cameras within licensing institutions can vary based on the location and the type of identification being issued. However, the majority of institutions utilize digital cameras specially crafted for ID photo capture. These cameras are usually equipped with high-resolution sensors, enabling them to capture images with uniform lighting and precise color accuracy.

Take an ID Photo with Your Phone Tips
· Ensure Camera Lens is Clean: Wipe the camera lens to ensure no dust or dirt is affecting the photo quality.
· Certainly, nowadays, many photo editing apps on the market provide a dedicated template for ID photos. They can automatically adjust the background, image dimensions, and lighting. Moreover, you can customize the type of clothing based on your preferences, such as shirts, suits, jackets, and more. These apps are user-friendly and highly efficient. One of the image editing apps I frequently use is Meitu.

State ID and Driver’s License Photos: Legal Requirements
To help you gain a clearer understanding of what a proper State ID or driver’s license photo should entail, let’s delve into the legal prerequisites regarding their appearance and content.
These requirements might differ based on the state, jurisdiction, and type of ID under consideration, but their overarching purpose is to ensure that the ID photo faithfully represents the individual and is suitable for identification purposes. Here are some general requirements:
1. Size
Common Photo Sizes(Inch) | Good Quality(Pixels) | Better Quality(Pixels) |
3.5*5 | 630*900 | 1050*1500 |
4*6 | 720*1080 | 1200*1800 |
5*7 | 900*1260 | 1500*2100 |
6*8 | 1080*1440 | 1800*2400 |
The photos must adhere to specific dimensions, typically 2 inches by 2 inches or 1.5 inches by 1.5 inches, depending on the state. However, if you follow the guidance on posture and lighting mentioned earlier, the idpapa team can assist in editing the photo dimensions for you.
2. Background
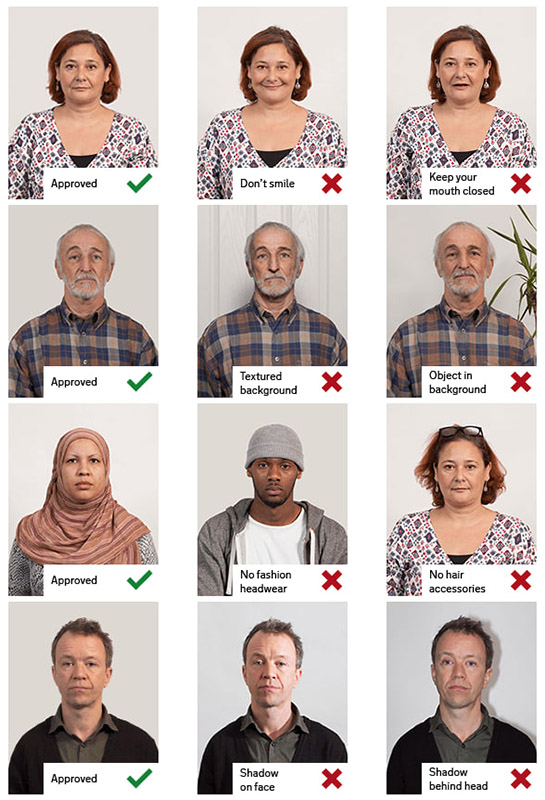
The photo background should be a plain, light-colored backdrop without any patterns or designs. This is to create a contrast that facilitates easier identification of the person's face.

3. Lighting
The lighting should be uniform, without any shadows obscuring the person's face.
4. Expression
The individual in the photo must maintain a neutral expression, with open eyes, and gaze directly at the camera.
5. Head Position
The person's head should be straight, facing directly forward, and both ears must be visible. Since everyone has unique ear shapes, they are among the most distinguishing features, and thus, they must be visible in the photos.
6. Clothing
The individual in the photo should not wear anything that might obstruct their face, such as a hat or sunglasses.
7. Photo Quality
The photo must be clear and devoid of any distortions or blurring that might hinder the recognition of the person.
Driver’s License Photo Requirements
The ID Comment Sample page showcases ideal photos submitted by some of our customers. Depending on the type of scannable ID you're ordering (driver's license or state ID), you may need to consider specific photo-taking guidelines. Differences in ID photos between state ID and driver's licenses may vary by jurisdiction, but one distinction you should take into account, especially if you wear glasses.
Some jurisdictions may require driver's license photos to depict individuals wearing glasses if they normally wear them while driving, a requirement that might not apply to state ID photos.
This is because state IDs and driver’s licenses serve different purposes. State IDs are used to identify individuals while driver’s licenses are used as both proof of identity and to demonstrate that the individual is authorized to drive a car.
A driver's license can also serve to indicate whether the individual requires glasses for safe driving. This is why some jurisdictions mandate wearing glasses in your driver's license photo if you need them to drive. In the past, this was uncommon as glasses could obscure the face, complicating accurate recognition in the photo.
However, advancements in face recognition technology now allow for accurate identification even when the individual is wearing glasses, provided there are no reflections. Consequently, various licensing agencies permit glasses in driver's license photos if needed for driving. The requirement to wear glasses if necessary is not specific to a particular state.
The regulations regarding wearing glasses in driver's license photos may evolve and can differ between states and jurisdictions. Therefore, it is essential to research the specific requirements for driver's license photos in the jurisdiction from which you intend to obtain the scannable ID.
Can and Cannot Take a Photo for a Scannable ID
We can:
Keep your ears visible. If you have long hair, tuck it behind your ears or put it in a ponytail.
Check your jurisdiction’s requirements regarding glasses in driver’s license photos. If glasses are allowed, ensure there is no glare or reflections, and the frames don’t obstruct your face.
Take the photo against a white or off-white background.
Use ample lighting.
Ensure the photo quality is high for potential resizing.
When scaled down to a 2×2-inch format (standard ID size in most states), make sure your head is no longer than an inch from your chin to the top of your head.
Cannot:
Do not manually apply the black-and-white filter. If the state you're targeting for your scannable ID requires a black-and-white photo, let us handle that. Each state employs distinct black-and-white gradients, and only we can accurately replicate them.
Avoid using Photoshop to artificially age yourself in the photos.
Refrain from angling your head. Look directly into the camera, slightly tuck your chin, and ensure the shot is taken straight on.
State-Specific Requirements
State ID photos may vary in terms of specific requirements such as size, background color, and lighting from state to state, although many of them result in similar types of photos.
Each state's DMV or licensing agency has its guidelines and regulations for state ID photos, aiming to ensure clarity, accuracy, and usability for identification purposes. For instance, some states print black-and-white photos on the actual ID or driver’s license, while others use color photos.
The decision to use black and white or color photos on an ID is typically determined by each state's DMV. The reasons for some states using black and white photos on their IDs while others use color photos can vary.
One factor influencing the decision to use black-and-white photos is cost. Black and white photos may be less expensive to produce than color photos, and some states may choose them to save costs.
Another factor influencing the decision is security. Some states believe that black and white photos are less likely to be altered or counterfeited than color photos, enhancing the security of the IDs.
Ultimately, the decision to use black and white or color photos on an ID rests with each state's DMV or licensing agency. While some states may opt for black-and-white photos for cost or security reasons, others may choose color photos to provide a more accurate representation of the individual's appearance.

How to Spot California IDs
How to Spot California IDs
For many people, distinguishing a genuine California ID from a novelty card can be a challenge. However, with the right knowledge and expertise, recognizing the differences between a real ID and a novelty card can be quite simple. California drivers should always be mindful of the laws and regulations regarding the possession of a valid and genuine ID. Understanding the distinctions between the features of a real ID and a novelty card is crucial.
Know Different Types of California ID Cards
The California Department of Motor Vehicles (DMV) issues several types of identification cards that can be used for various purposes. These documents include the California driver's license, identification card, REAL ID driver's license, and REAL ID identification card. The California driver's license is the most commonly used form of identification in the state, granting individuals the privilege to operate motor vehicles. Driver's licenses must be renewed every five years.
The REAL ID driver's license is an enhanced form of identification valid for federal purposes, such as boarding domestic flights and accessing federal facilities. The identification card serves as another form of proof of identity and age, without authorizing the cardholder to drive. It is issued to individuals of any age.
The REAL ID identification card is an enhanced form of identification that can be used for similar purposes as the REAL ID driver's license. The Senior ID card is a form of identification for individuals aged 65 and older, displaying the cardholder's name, birthdate, address, and photo, meeting immigration and nationality law requirements.
If you are under 18, you may be eligible for the Minor's Permit Identification Card (MPIC). The MPIC is a photo identification card resembling a driver's license but does not authorize driving. It can be used as an authorized form of identification for various activities and other purposes, such as entering places where explicit language is allowed for individuals under 21.
Other types of identification cards in California include the Veteran ID card, Disability ID card, Disabled Veteran ID card, Disability Placard, and Commercial Driver's License. The California DMV can provide more information about these types of identification cards.
Whether you are seeking a driver's license for the legal operation of a motor vehicle, enhanced identification for boarding domestic flights, or other forms of identification for specific purposes, the California DMV can meet your requirements. It is important to understand the different types of California identification cards and ensure you have one that suits your needs.
Examine the Dimensions of the California ID
The California ID is a form of identification issued by the state of California to certify individuals as residents of the state. It serves various purposes, including providing age or identity verification, accessing state services, and registering to vote in the state. To obtain a California ID, applicants must present proof of their identity, U.S. citizenship, legal presence in the U.S., and residence in California. The standard dimensions of a California ID are approximately 3.39 inches wide by 2.13 inches high. The overall size of the California ID includes raised artwork, a magnetic stripe, and an embossed signature. Due to different security features applicable to the card itself, the size of a California ID may vary slightly from the standard dimensions. Security features such as tactile passport design, specially raised elements, or unique variations in card artwork (such as color-shifting and holograms) may necessitate adjustments to the ID's size to accommodate these features.
The California ID also incorporates several additional significant features to provide extra security, preventing fraud and forgery. These features include encoded magnetic stripes, biometric facial recognition, and contactless technology. The magnetic stripe itself contains encoded information about the individual, including the issuing agency, date of birth, and a photo image of the cardholder. Facial biometric recognition technology can be used to confirm the identity of the cardholder when requested at airports, borders, or other government agencies. Finally, contactless technology allows individuals to quickly and easily verify their identity through a simple swipe or tap.
In summary, the design of the California ID is crafted to ensure the safety of its citizens. Through the combination of its features and dimensions, the card is designed to provide robust protection against identity theft and other criminal activities. Therefore, any California resident can rest assured that their ID is designed with security and safeguarding considerations in mind.
Verify the Background Security Features of the California ID
California residents must hold a valid California ID when boarding flights, visiting secure facilities, or registering to vote, ensuring the verification of their identity. To maximize the security of the California ID, several advanced security features are applied to the ID.
The California ID includes a distinctive hologram and laser-engraved image. The bright hologram shifts from green to gold when tilted and the laser-engraved image is positioned on the front of the ID. The hologram serves as a security feature designed to prevent counterfeiting and card forgery. Additionally, the laser-engraved image is nearly impossible to replicate and is utilized to authenticate the card's legitimacy.
On the back of the ID, there is a UV pattern imprinted on the photo. The UV pattern is a photo encoding used for verification with a specialized fluorescent reader to confirm the authenticity of the card. This UV pattern is unique to the cardholder and linked to personal information.
The California ID incorporates a digital signature, also employed for verifying the identity of the holder. This digital signature is cross-referenced with other information, such as that stored in national databases. This cross-referencing ensures that the individual to whom the card belongs is indeed the person attempting to use the ID.
Lastly, a valid expiration date must be present on the California ID and visible to security officers. This expiration date is a physical security feature that must be checked when verifying the cardholder's identity. The expiration date serves as a crucial indicator that the ID is still valid, and the holder's identity is confirmed.
By employing these diverse advanced security features, the California ID can authenticate the identity of the cardholder swiftly. Security personnel can quickly verify the authenticity of the ID by simply looking for the bright hologram, UV pattern, and laser engraving. In conclusion, these security features ensure the safety of the California ID and contribute to protecting California residents from fraud and other illicit activities.
Check the Professionalism of the Artwork on the ID Card
Checking the professionalism of the artwork on an identification card is necessary because it carries elements representing official authorities. Regular checks should be conducted to ensure that the artwork aligns with the standards set by the issuing company or organization. This article will provide insights into how to check the professionalism of the artwork on an identification card.
The first consideration is the size and shape of the artwork. It should match the size and shape of the identification card. The colors used in the artwork should also be accurate. In some cases, the organization's logo or artwork may have specific color codes. When examining the patterns on the identification card, it is crucial to ensure that the colors match the organization's logo or official design.
The design of the artwork should also be professional, and crafted in a simple yet effective manner. Any artwork that is overly complex or too busy may be deemed unprofessional. If unsure about the appropriateness of the artwork's design, it is advisable to seek advice from someone working in the design or advertising industry.
Consideration should also be given to the font type used in the artwork. Choosing a font that is easy to read and aligns with the company guidelines is essential. For example, if it is a student ID, the font type should be formal and easy to read. It should not be overly fancy or too cartoonish.
Lastly, it is crucial to remember that the artwork should be consistent across all ID cards. Each card should use the same logo and the size and design of the artwork should be uniform. This is crucial for presenting a professional and organized image of an organization or company. By taking these steps, the professionalism and accuracy of the artwork on identification cards can be easily checked. This creates a consistent and positive impression of the organization or company for any potential clients or partners.
Creating a perfect identification card can be tricky—you need to ensure that the document's professional look and feel are adequately reflected. To ensure that your ID card looks and feels professional, you need to keep the following points in mind:
- Font Types
- Image Quality
- Text Alignment
- Color Balance
- Card Design
Inspect the Lamination on the California Driver’s License
The laminate on a California driver's license is a component of the card's protective measures. To safeguard the card from water, dirt, scratches, and other damage, this lamination also helps reduce the risk of identity and credit card theft. It is essential to carefully inspect the laminate on a California driver's license to ensure it remains intact. To check the lamination, hold the card up to the light so that you can see both sides. It is crucial to look for any discoloration, bubbles, tears, or creases in the lamination. Pay particular attention to areas such as the photo, signature, small text, and ensure there are no irregularities. Additionally, as you examine it, run your fingers over the lamination, searching for a rough or bubbled feel, indicating any damage. If you discover signs of wear or other damage to your California driver's license, you must contact the DMV immediately. If the lamination is unstable, the material may be hazardous and should be replaced. The DMV will provide you with a new card free of charge. It typically takes 5 to 7 business days to receive a new card. The laminate on a California driver's license is crucial, and regular checks are necessary. To minimize the risk of damage, storing your card in a secure place is also essential. Finally, ensure that you promptly visit the DMV as soon as you notice any issues, so you can quickly obtain a new card.
Check the Accuracy of Your Personal Information on the California ID
Whether you have recently updated your California driver's license or received a new identification card, ensuring the accuracy of the personal information contained in the documents is crucial. Inaccurate information may lead to future problems when renewing, obtaining other documents or services, or filing insurance claims. Once your California identification card is in your possession, it is essential to check that your name, birthdate, address, and photo are all accurate. You can take several steps to ensure your information is correct.
First, take a few minutes to thoroughly review this information. Compare it to the documents you used to apply for identification, including your birth certificate or passport and your Social Security card. Ensure the birthdate and address are spelled correctly.
Second, check the photo to ensure it accurately reflects your appearance. This is especially important if you've undergone significant changes, such as a change in hair color or facial hair. Remember that an incorrect photo may cause delays in identity verification.
Third, check the physical features listed on the identification card. Depending on the type of license, you may be able to directly modify your height, weight, or organ donor preference on the card. For example, the California driver's license has a section indicating "organ donor." Ensure this accurately reflects your preference.
If you discover any errors, please contact the California Department of Motor Vehicles (DMV) as soon as possible. The DMV will work with you to correct errors on your identification card. Typically, this process takes about 8 to 10 weeks.
You should also ensure that your online DMV profile is up to date. This includes information such as your mailing address, email address, and contact phone numbers. You can update your details by logging into your account on the official DMV website.
By following these steps, you can ensure that the personal information on your California identification card is accurate. Be sure to review your information and check your DMV profile again after any changes or updates. Doing so will help ensure that you receive accurate services and benefits promptly.
Look for Expiration Dates and How the Numbers are Printed
When purchasing food, cosmetics, and other consumables, it is crucial to ensure that you are aware of the expiration date. Knowing when a product expires is an essential factor for consumers. The expiration date is typically printed directly on the packaging or near the barcode. However, the format of the printed date may vary depending on the brand and the product itself. In this article, let's delve further into how expiration dates are printed and what the printed numbers mean.
The most common numeric printing format is the year-month-day format, with each part consisting of two digits separated by slashes. For example: 03/02/22 represents March 2, 2022. In contrast, on some products, the expiration date is written in the month-day-year format, opposite to the typical usage in the United States. The date will be displayed as 02/03/22 instead of 03/02/22.
Another way manufacturers print expiration dates is by simply listing the year, month, and day the product expires. For instance, early 2022, the third month, the second day. This approach is becoming increasingly common across all types of products. Some items may also feature a coding system where the expiration date is encoded on the packaging. The coding system is universal, so most manufacturers producing the same product follow a similar code.
In most cases, the first digit indicates the year, whereas "2" may represent 2022. The second and third digits represent the month, often associated with letters representing the month. "A" typically stands for January, while "B" stands for February. Finally, the last two digits represent the day and are printed together. For example, "22" might represent the 22nd of the month.
It is important to remember that checking the expiration date is crucial when purchasing products, and one should consider all these different formats during scanning. By paying attention to expiration dates, you contribute to maintaining the safety of the food and products you consume.
It is crucial to be aware of the items' expiration dates so that you do not use products beyond their freshness or safety dates. Paying attention to how expiration dates are printed is also essential.
Check if the ID Has a Signature and How it Was Created
Verifying whether an ID has a signature and understanding its creation process is an important step in ensuring the security of personal information. In situations where you need to prove your identity, such as opening a new bank account or obtaining a driver's license, you must provide a signature and other identification information. The signature serves as a unique identifier, confirming your identity in an undeniable and traceable form. The purpose of the signature is to verify that you are the actual person associated with your personal information, not someone else. It also ensures that the documents you sign can be used as a form of identification when necessary and can be traced back to you for verification.
Signatures can take various forms—handwritten or digital. To create an effective and secure handwritten signature, you should practice writing your name repeatedly until your signature captures your style. Equally important is to ensure that you sign documents consistently each time, as having a traceable identifier is crucial when dealing with the legal system.
Digital signatures involve using software and encryption tools to electronically sign documents. This form of signature provides higher security, allowing users to identify the signer, add a timestamp to the document, include document verification, and protect the original content. It is also important to understand how your ID documents are created to ensure they serve as legitimate forms of identification.
By understanding the process required to create a genuine signature that provides valid and secure proof of identity, you can ensure that your data and documents remain safe and protected.
Inspect the Hologram on the California License
Inspecting the hologram on a California driver's license is one of the few quick and confident methods of verifying someone's identity. This hologram covers a significant portion of the license's surface, displaying a three-dimensional image of the California state seal, adding a level of difficulty for anyone attempting to forge the document. It also showcases other images such as mountains, ocean, seagulls, and the words "California" and "Driver's License." The hologram becomes particularly noticeable when viewed from different angles, exhibiting a subtle rainbow-colored sheen, especially when light captures the license precisely.
When examining the hologram, be sure to look for any signs of tampering or wear. Alterations are usually evident to the naked eye, so any irregularities should raise concern. While inspecting the hologram, you should also look for a heat-stamped overlay that covers most of the license. This will appear as black-stamped material across the hologram. Heat stamping is employed to further protect the license from fraudulent activities. It is crucial to note that a license with damaged or missing heat stamps has likely been tampered with and should not be considered genuine.
Paying attention to any visual discrepancies in the hologram is also important. An official California driver's license will prominently feature the state emblem, mountains, ocean, and seagulls, as well as the words "California" and "Driver's License." If any of these elements appear faint or off-center, it could be a sign of forgery. Finally, when inspecting the hologram, be sure to look for any flaws or smudges. If the hologram appears scratched or blurred, it could be indicative of a counterfeit. The hologram should display all elements, and the lines should be sharp and clean. Any signs of wear or incompleteness may suggest a forged license. Checking the hologram on a California driver's license is a crucial aspect of verifying someone's identity. Whenever faced with this task, be thorough in examining various aspects of the license for any irregularities, allowing you to confidently verify someone's identity.
Look for Any Tiny Print or Text on the California ID Card
Taking the time to search for any tiny prints or texts on a California identification card is crucial. California IDs issued by the Department of Motor Vehicles (DMV) have unique features designed to deter forgery and enhance card security. Details such as the photo, signature, personal information, and ID number are printed in small fonts, making them challenging to replicate. The most significant text is located just below the photo, featuring the cardholder's name, birthdate, gender, and the card's expiration date. Additionally, there are several other sections of text on the California ID, all written in small fonts, which may include details like city, state, zip code, home address, ID number, office address, height, hair color, eye color, and more.
Furthermore, at the bottom corner of the card, small text displays the issue date and the DMV office. Along the bottom edge of the card, there is a special code used to identify the card type. This code consists of two letters, with the first letter representing the card type and the second letter representing the state issuing the card.
When holding the card, you'll notice two holographic seals on the left and right sides. These holograms appear to change when observed from different angles. All California IDs have a barcode on the back containing the cardholder's information, facilitating identity verification.
How to Pay For My ID?
How to Pay For Scannable ID Purchase?
Looking for the premium scannable ID but unsure how to pay for it? Look no further than our convenient payment options. These methods are ideal in terms of privacy and ease of use. We accept three payment options and this guide will explain how to use each one. Here is a list of modes of payment acceptable by our system:
· Bitcoin/USDT
· CREDIT CARD/Debit Card
· PayPal
· AMAZON GIFT CARD
· Bank Transfer
1. Bank Transfer
Bank transfer is one of our commonly used payment methods, especially favored by group-buying customers. Depending on the customer's country, we provide the corresponding bank account information. Currently, we support international payments, domestic payments within the United States, and domestic payments within Canada.
Typically, the processing time for bank transfers is within 24 hours. However, due to certain banks having strict protocols, the processing time may extend to 24-48 hours.
The primary advantage of bank transfers is that you can confirm the successful payment and have the option to reclaim funds promptly. Additionally, online bank transfers are supported for completing order payments.
2. Bitcoin/USDT
This is the simplest and quickest payment method for order processing. It enables us to expedite your order. To use this payment method, choose "BITCOIN" in the payment options during checkout. At the end of the order, you will receive contact details to tag for IDpapa customer service. We also accept Bitcoin Cash (BCH), and you can make payments to our address using your CashApp account.
3. Credit/Debit Card
Credit card payments can be conveniently completed directly on IDpapa's payment page. However, if you encounter any payment issues, feel free to reach out to IDpapa customer service. Additionally, we will provide alternative methods to assist you in completing payments with your credit card.
Before you proceed with the payment for your scannable card, please note: To protect your payment privacy and safety, the product will appear as "baby furniture" on the payment page as well as your credit card statement. This is intentionally done to ensure discretion. We appreciate your understanding.
4. AMAZON GIFT CARD
Since we only accept Amazon Gift cards purchased in the US & in person. We do *NOT* accept Amazon gift cards purchased online (i.e. e-codes). Please follow the steps below to complete your order:
· Step ONE:
Visit our IDpapa ordering page, add the items you need to your cart, and once you've added the items, proceed to the payment page by clicking on it.
· Step TWO:
Once you enter the payment page, you will see the total amount due for your order. Please make sure to note the order amount. Next, proceed to select your payment method. For faster assistance, we have 24-hour live customer support available.
· Step Three:
Visit a Grocery, Gas Station, or convenience Store such as CVS, Walmart, Walgreens, RiteAid, 7-Eleven, Target, Kroger, or Albertsons, or check Google Maps to find any other store near you with Amazon Gift Cards available on their shelves.
· Step Four:
Load your calculated total in USD to the Amazon Gift Cards.
Note: Please select Amazon gift cards with denominations of $199 or below. For example, if the order amount is $210, we recommend purchasing one $100 Amazon gift card and one $110 Amazon gift card.
· Step Five: (you need to provide for us)
Please provide a photo of the Amazon gift card with the card number(plz confirm that the card number starts with AQ... ). It's best if there's a receipt from the card purchase.
Customers often take photos of receipts and gift card codes and send them to us.
PS: The payment verification will be delayed. Once the verification is successful, you will receive our card information confirmation letter by email/Whatsapp/Telegram. If it's not successful, we will notify you.
If you need prompt guidance, you can directly contact our customer service. Due to a high volume of customer inquiries, we strive to respond within 1 hour.
5. Paypal
PayPal is one of the preferred payment methods for IDpapa customers. However, as widely known, PayPal does not support receiving payments or transferring funds for the use of scanning card services.
Nevertheless, to meet the demands of our valued customers, we have devised a solution. We will receive payments through alternative methods. Due to the high volume of transactions, there may be delays in payment processing. However, rest assured that we will promptly contact customers as soon as there are any updates on payment receipts.
If you would like to inquire about more contact options, feel free to reach out to IDpapa customer service.